RSS

Pork, Shrimp & Kimchi Soup Dumplings

finished-soup-dumpling

Everyone knows how obsessed I am with soup dumplings.  The first time I had them at Cholon in Denver my mind was blown.  Cholon is an Asian-Fusion restaurant so their take is a French onion soup dumpling.  It’s this delicious concentrated stock set with gelatin, cheesy gruyere, and caramelized onions.  The moment you bite into it, the broth fills your mouth and it is the biggest flavor explosion EVER.  They are amazing!

I’ve tried to make soup dumplings at least a dozen times and have failed miserably.  These are hard and to be honest even this time which was by far my best try thus far, I still haven’t mastered the part where the broth stays in the dumpling.  They are HARD but they are also so good that I can’t get myself to give up trying to perfect my method.

I went the more traditional Asian route on these and they are wonderful.  Even when the broth does spill out during steaming, you’re left with a highly flavored and delicious dumpling.

They make a hefty amount so I froze them to re-steam whenever I have a hankering.  If you have an extra set of hands to help you assemble the dumplings, it will cut down on time significantly.  I suggest making the broth and filling on Day 1 and finishing up the rest on Day 2 so it’s not so daunting of a task.

Good luck.  I hope you enjoy these as me and if you have tips on keeping the broth in the dumpling, please share!

Grocery List

  • Ground Pork, 1 pound
  • Cooked Shrimp, 1 pound (1/4 pound shrimp + shells of entire package)
  • Light soy sauce (regular soy sauce), 2 Tbsp.
  • Dark soy sauce, 2 Tbsp.
  • Mirin, 1 tsp.
  • Sesame Oil, 1 tsp.
  • Green Onions, 1 bunch
  • Kimchi, 1/2 cup finely chopped
  • Dumpling Wrappers, 1 package
  • Black Peppercorns, 6 peppercorns
  • Garlic, 1 clove
  • White Onion, 1/4
  • Bay Leaf, 1
  • Fresh Thyme, 2 sprigs
  • 1 Lemon, 1/2
  • Gelatin, 1 Tbsp.

Step 1: Make Shrimp Stock

shrimp-stock

  • Shrimp Shells from 1 pound package
  • 6 cups water
  • Green onion tops, green parts from 1 bunch
  • 6 black peppercorns
  • 1 garlic clove, smashed
  • 1/4 white onion
  • 1 bay leaf
  • 2 sprigs thyme
  • 1/2 lemon
  • 2 mushrooms
  • 1 Tbsp. gelatin

Shrimp Stock Directions:

  1. Add all ingredients except gelatin to a stockpot.  Bring to a boil then reduce heat to a simmer.  Simmer until reduced to 2 cups.
  2. Strain stock and return to pot.  Season with salt and pepper to taste.
  3. Dissolve gelatin in 3 Tbsp. water until softened.
  4. Add softened gelatin to stock.  Stir until completely dissolved.
  5. Pour mixture in an 8×10 glass baking dish.
  6. Refrigerate overnight.

Step 2: Make Filling
little-helper-2
My Sous Chef, Oscar
  • 1 pound ground pork, browned and cooled
  • 1/4 pound shrimp, very finely chopped
  • 1/2 cup green onions, white parts only, very finely chopped
  • 1/2 cup kimchi, very finely chopped
  • 2 Tbsp. light soy sauce
  • 2 Tbsp. dark soy sauce
  • 1 tsp. mirin
  • 1 tsp. sesame oil

Filling Directions

  1. Add all ingredients to a large bowl and stir together.  Use a wooden spoon to break up any larger pork pieces.  You want a very fine filling to make your life easier when it’s time to assemble the dumplings.
  2. Taste mixture and make adjustments as needed.  It should taste salty (soy), a little sweet (mirin), and a little funky (kimchi).
  3. Refrigerate until ready to assemble dumplings.

Step 3: Assemble Dumplings

  • Gelled Shrimp Stock
  • Dumpling Filling
  • Dumpling Wrappers
  1. Cut gelled shrimp stock into 1/2″ cubes.  Add to filling mixture and stir very gently just to incorporate.  Set aside.
  2. Get a working station set-up.
    – Dumplings covered with wet paper towels.
    – Small bowl with water and a brush to dampen dumpling wrappers.
    – Filling mixture
    – Cooked sheet lined with parchment paper.
    work-station
  3. Watch a YouTube video on how to assemble a dumpling.  Make sure to leave a small hole at the top of the dumpling.  Steam needs to escape the dumpling while cooking.  If no hole, the broth will leak out of the dumpling.
    https://www.youtube.com/watch?v=yxoRhv5TEqM

    rolled-dumpling

  4. Place dumplings on parchment paper making sure they aren’t touching.
  5. Freeze for 2 hours and transfer frozen dumplings to a freezer-friendly container.

Step 4: Prep Dumplings

  1. Line each layer of a bamboo basket with cabbage leaves.
  2. Arrange dumplings on cabbage leaves so they are not touching.
    bamboo-basket
  3. Steam from frozen for 12-15 minutes and 10-12 minutes from fresh.
  4. Serve immediately.


Leave a comment

Posted by on March 5, 2017 in Uncategorized


Pommes Dauphine (Potato Puffs)

Pommes Dauphine

I first tried Pommes Dauphine at Vincent A Restaurant in Minneapolis.  I was there for a work outing and didn’t think much of the appetizer when it was ordered because it just sounded like fried potatoes but as soon as I took one bite I couldn’t believe how light and fluffy and delicious and wonderful and so on and so forth they were.

I made potato skins this weekend for Sunday Football Funday appetizers and needed to use up the insides of 5 pounds of potatoes so thought this would be a great time to try and make these suckers at home.  It turns out they really aren’t as difficult as I thought they would be.

I’m pretty sure Oscar went one for one on these with his dad.  He honestly ate so many of these he went into a food coma and is on his second 2 hour nap of the day.  We’re teaching him really young what Sundays are all about in this house.  Football, eat, nap, repeat!

Oscar and Dad Pommes Dauphine (2)Oscar Pommes

Ingredients:
Potato Mix:

  • 1 pound potatoes, cooked and mashed
  • 2 Tbsp butter
  • 1 egg yolk

Pate Choux Dough:

  • 1/2 cup water
  • 3 Tbsp butter
  • 1/2 tsp salt
  • 3 oz flour
  • 4 large eggs + 1 large egg white

Directions:

  1. Add butter to warm mashed potatoes and season to taste with salt and pepper.  Add egg yolk and mix to combine.  Set aside.
  2. Boil water, butter, and salt over medium high heat in a heavy stockpot.
  3. Once boiling, remove from heat and add flour.  Stir to combine.  Return stockpot to burner over medium heat.  Stir vigorously until dough leaves the sides of the pot.
  4. Transfer dough to a kitchen aid bowl and allow to cool.
  5. Turn mixer to first speed and gradually add eggs fully incorporating before each new addition.  Scrape down bowl as needed.
  6. Add potato mixture and mix on first speed until fully incorporated.
  7. Fry batter by spoonfuls in neutral oil (peanut or canola) at 375F for 3-5 minutes or until nicely golden brown.
  8. Sprinkle with parmesan cheese and serve immediately.
 
Leave a comment

Posted by on September 20, 2015 in Appetizers, Sides


Tags: , ,

Chili over Cheesy Polenta

Chili over Polenta

I haven’t written a blog post since before I was pregnant which has now been almost 2 years.  I used to feel guilty for not writing then I realized I was not writing because I was out exploring the world, enjoying my family, and getting on with other things.  It might be another 2 years until  write the next one and that is ok.  I started this blog as a hobby and can see how it quickly became another responsibility.  Anywho, I have put things into perspective and I’m here now so that’s all that matters.

The hubby and I made it our summer goal to add some curb appeal to the outside of our house by adding shutters and painting a door.  So in true fashion, we were working on this until Labor Day Monday evening.  Nothing like putting it off until the last minute!

Look how great it turned out though.  I love the door so much.  It makes me happy every time I drive up now.

House (Before)House (After)

Since I knew I would be outside all day, I wanted something easy for dinner that would also be hearty enough to fill us up after a long work day.  I had a small amount of left over shredded beef from the day before and also wanted to be able to extend that as much as possible so what better way than to make chili.  Topping this quick chili over cheesy polenta completely amps up this dish and takes it to a whole new level.  My husband raved and kept asking for more, more, more.  I hope your family enjoys it as much as mine!

Erin

Chili over Cheesy Polenta

Serves: 4

Ingredients:

  • 1/2 pound stew meat
  • 1 can diced tomatoes in sauce
  • 1 green pepper, diced
  • 1/2 white onion, diced
  • 1 can S&W chili beans
  • 1 envelope McCormick chili seasoning
  • 4 cups skim milk
  • 1 cup instant grits
  • 2 cups extra-sharp cheddar, shredded
  • 2 Tbsp butter
  • salt and pepper to taste

Directions for Chili:

  1. Liberally season stew meat with salt and pepper and bring to room temperature.  Heat a heavy skillet over medium-high heat until almost smoking.  Add stew meat and sear until nicely browned on all sides.  Transfer meat to slow cooker.
  2. Add diced tomatoes, pepper, onion, chili beans, and chili seasoning to slow cooker.  Stir everything together and set to low for 6-8 hours or until stew meat shreds easily with a fork.

Directions for Cheesy Polenta:

  1. Slowly bring milk to a boil over medium-high heat in a large pot.  Stir the milk frequently so it doesn’t burn.
  2. Once milk is boiling, add grits in a steady stream while stirring vigorously.  Reduce heat to low and cover for 5 minutes.
  3. Remove lid from pot and add cheese in batches until fully incorporated and melted.
  4. Season with salt and pepper to taste.
  5. Add butter and stir until melted.
  6. Serve hot polenta in bowls and top with chili.
 
Leave a comment

Posted by on September 10, 2015 in Uncategorized


Tags: , , , ,

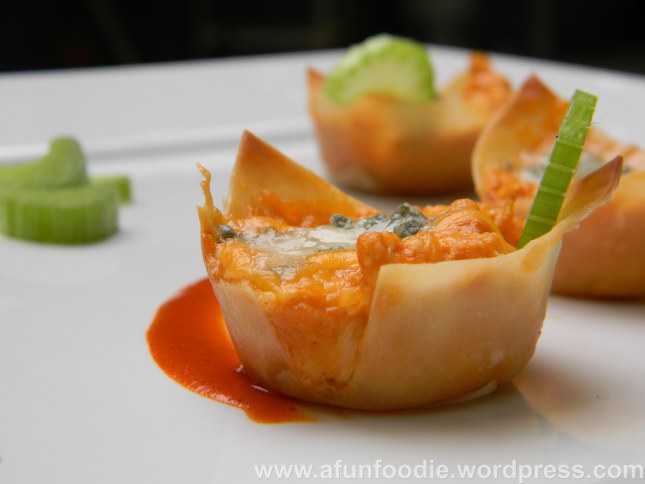
Buffalo Chicken Wonton Cups

Sunday Football Funday is coming soon so I thought it would be appropriate to repost this recipe.

afunfoodie

Buffalo Chicken Wonton Cups

These little guys are all over Pinterest and I just had to try them for myself to see what the fuss is about.  Since they make such a big batch, I decided to make them for a bachelorette party I was throwing.  They did not fail me!  I honestly think I could have polished off all these by myself.

They are easy, quick, and a perfect bite-size snack.  This recipe will definitely be coming out next football season.  Another plus is that you can prepare a bunch of them and throw them in the freezer until you need them.

Yield: 54 mini wonton cups     Prep Time: 30 minutes     Cook Time: 10 minutes

Ingredients:

  • 1 (8oz) package cream cheese, softened
  • 1/2 cup Ranch dressing
  • 1/2 cup Frank’s hot sauce
  • 1 cup shredded cheddar cheese, divided
  • 1 1/2 cups cooked and shredded chicken
  • 12 wonton wrappers
  • 1/4 cup blue cheese crumbles
  • Celery…

View original post 145 more words

 
2 Comments

Posted by on September 3, 2014 in Uncategorized


Chicken Fried Rice

Chicken Fried Rice

If you ever have leftover white rice that has been in the refrigerator, it can find a new home in fried rice.  This recipe can be cut down according to how much rice you have leftover.  You can always make it fresh as well, but just make sure you cook the rice and allow it to dry out overnight in the refrigerator before assembling to avoid mushy rice.

Yield: 16 Servings
Active Time: 30 minutes

Ingredients:

  • 2 chicken breasts
  • 6 Tbsp. soy sauce
  • 1 tsp. sesame oil
  • 2 Tbsp. cornstarch
  • 6 cups white rice, dry
  • 8 Tbsp. peanut oil
  • 3 tsp. sesame oil
  • 1 cup diced carrots
  • 1 cup peas
  • 1 small yellow onion, diced
  • 1 bunch green onions, chopped
  • 3 garlic cloves, minced
  • 4 eggs, lightly beaten
  • 1/2 cup soy sauce

Directions:

  1. Cook 6 cups white rice with 6 1/4 cups water in a rice cooker.  Transfer rice to a cookie sheet lined with parchment paper and place in refrigerator overnight to dry out.
  2. Dice chicken breasts into 1/2″ pieces.  Place in a Ziploc bag and add 6 Tbsp. soy sauce and 1 tsp. sesame oil.  Marinate for 30 minutes.  Toss chicken with 2 Tbsp. cornstarch.
  3. Heat peanut oil and sesame oil in wok at 375F.  Add chicken to wok until browned, about 5 minutes.
  4. Add carrots and stir-fry until slightly softened, about 3 minutes.
  5. Add peas, onions, and garlic .  Cook for another 3 minutes, stirring frequently.
  6. Make a hole in the middle of the wok with a spatula and add eggs.  Allow to fry for a minute then scramble and mix in with the rest of the vegetables.
  7. Add cooked rice to wok and toss to coat with oil.
  8. Add 1/2 cup soy sauce stirring frequently until thoroughly cooked and heated through.
 
3 Comments

Posted by on January 13, 2014 in comfort, Entrees, Uncategorized


Tags: , , , ,

Sweet and Spicy Venison Jerky

Sweet and Spicy Venison Jerky

“The Men” went deer hunting a few weeks ago, and I told myself for months that when this day arrived, I would force myself to buy some new clothes.  I really do not enjoy clothes shopping, which is probably why all of my jeans have holes in them and my shirts are covered in stains from 5 years ago.  So while the manly men went to sit in their deer stands, I went shopping for probably the 3rd time in my life since I moved out of my parent’s house, and no, I’m not THAT young!

I was rewarded for my shopping efforts with a giant hunk of venison.  I knew immediately that I wanted to try my hand at jerky and it was worth it.  It’s time consuming but certainly not difficult.

The jerky has a sweet marinade but the spice blend lends a peppery heat. It’s pretty addicting. This was my first time ever making jerky so I really didn’t want to go out and by a dehydrator since I had no idea if this was something I would want to do again. After I made it, I have determined that I do want to do it again, although the oven worked really well for me so I’m not sure I need to buy the dehydrator anyway.

Ingredients:

Spice Blend

  • 1 Tbsp. onion powder
  • 1 Tbsp. garlic powder
  • 2 tsp. fresh ground black pepper
  • 1 tsp. curing salt

Marinade:

  • 1/2 cup brown sugar
  • 2/3 cup soy sauce
  • 1/4 cup teriyaki sauce
  • 1/4 cup extra-tenderizing Worcestershire sauce
  • 1/3 cup Balsamic vinegar
  • 4 Tbsp. hickory liquid smoke
  • 1/2 cup pineapple juice

Meat

  • 1 pound lean venison meat

Directions:

  1. Mix together seasoning ingredients, set aside.
  2. Mix together marinade ingredients in a large bowl with an airtight container and set aside.
  3. Thinly cut venison into 1/8″ strips, cutting against the grain of the meat using a very sharp knife.  If this is proving difficult, put the meat in the freezer for about 10 minutes to make this part a bit easier.
  4. Toss the meat with the seasoning mixture to coat.  Submerge meat in marinade, cover, and let sit for at least 3 hours and a max of 6 hours.
  5. Drain meat in a colander.
  6. Lay strips out in a single layer on 2 cooling racks (the ones you use to cool cookies when they come out of the oven).
  7. Place oven racks to high and low positions then place cooling racks on oven racks.
  8. Place a thermometer in the oven, and prop the oven open with a small fan on high (I used a battery powered fan that we generally use for camping.  Get creative here, you want constant airflow to promote the drying process).
  9. Once an hour, preheat oven to lowest possible temperature (mine was 170F).  Once the thermometer reaches 100F, turn the oven off.  Rotate racks every hour to ensure even heat and drying.
  10. The amount of time it takes to dry will depend on the thickness of the strips.  Mine took about 8 hours total.
  11. Once meat is thoroughly dehydrated, place in an airtight container or glass jar (avoid ziploc bags as they tend to store moisture which will promote mold growth).
  12. Hoard and eat!
 
10 Comments

Posted by on December 14, 2013 in Fall, Made from Scratch, Uncategorized


Tags: , , ,

10 Minute Pecan Pie Filling

Pecan Pie Slice

This pecan pie filling comes together in 10 minutes, no joke. I am usually so focused on the dinner that I will be serving that dessert is always an after thought if it even happens. After realizing how easy it really can be, I now have a go-to last minute dessert recipe.

If you’re not in a hurry, you can obviously make your own pie crust which is always preferred.

Ingredients:

  • 1 frozen pie crust
  • 1 cup pecans
  • 1 cup sugar
  • 3 Tbsp. light brown sugar
  • 1 cup light corn syrup
  • 1/2 tsp. salt
  • 3/4 tsp. pure vanilla
  • 1/4 tsp. cinnamon
  • 1/3 cup melted butter
  • 3 eggs

Directions:

  1. Preheat oven to 350F.
  2. Chop pecans and add them to the pie crust in a single layer.
  3. Mix remaining ingredients in a large bowl until combined.
  4. Pour over chopped pecans.
  5. Loosely cover pie with tin foil.  Bake for 30 minutes covered.
  6. Remove tin foil and bake for an additional 20 minutes or until center is “set.”

Pecan Pie

 
4 Comments

Posted by on November 23, 2013 in Dessert


Tags: , , , , ,

Turkey Stock

Turkey Stock

In my, not so, humble opinion a great Thanksgiving dinner starts with good stock.  So many recipes will call for chicken broth, but I have found that substituting it out with homemade turkey stock adds a much richer flavor than any canned chicken broth can offer.  For this recipe, I roast the ingredients over very high heat to get a darker color.  With color comes flavor.  You know you have nailed it, when the stock turns to gelatin upon cooling.  I treat this stuff like liquid gold and I think I could just drink it by the cupfuls.

Yield: 20 cups

Ingredients:

  • 15 pounds turkey legs
  • 6 yellow onions, quartered with skin on
  • 6 celery stalks, leaves removed and very coarsely chopped
  • 6 carrots very coarsely chopped
  • 48 cups water (12 quarts)
  • 15 parsley stems, leaves removed
  • 3 bay leaves
  • 3 Tbsp. whole black peppercorns

Directions:

  1. Place rack in lowest position in oven.  Preheat to 500F.
  2. In batches, roast turkey legs in a large roasting pan for an hour, turning halfway through.  Transfer turkey legs to a large stockpot (I had to use 2 stockpots to fit everything).
  3. Next roast onions, celery, and carrots for 30 minutes, stirring halfway through.  Transfer vegetables to stockpot.
  4. Deglaze roasting pan by heating on stove and adding 4 cups of water.  Add liquid to stockpot(s).
  5. Add remaining 44 cups of water to stockpot(s), parsley, bay leaves, and peppercorns.  Heat over low heat for about 12 hours tasting along the way.  When it’s ready, it should have a rich mouthfeel and deep flavor.
  6. Once you are happy with the flavor, strain the stock, refrigerate, and skim fat off of top.
  7. Reheat strained and skimmed stock over low heat.  Add salt and pepper to taste.
  8. Use refrigerated within a week or freeze for 6 months.
 
Leave a comment

Posted by on November 16, 2013 in Made from Scratch, Uncategorized


Tags: , , ,

Homemade Ricotta Cheese

I made this again yesterday and I forgot how easy and amazing homemade ricotta is. Try adding it to your lasagna. You will not regret one single ounce of this creamy goodness!

afunfoodie

Ricotta Cheese

Yield: 2 cups

Ingredients:

  • 8 cups whole milk
  • 1 cup heavy cream
  • 2 tsp. salt
  • 1/2 tsp. fresh ground black pepper
  • 3 Tbsp. lemon juice

Directions:

  1. Slowly bring milk, cream, and salt to a boil.  Stir often so milk doesn’t scald on bottom of pot.
  2. Once boiling, add lemon juice, reduce heat to simmer, and stir just to mix.
  3. Let mixture curdle for approximately 2 minutes.
  4. Pour mixture through fine mesh sieve or cheesecloth and allow to drain for an hour.
  5. Transfer to an airtight container and refrigerate until ready to use.

Note: Use within 2 days.

Recipe adapted from “Epicurious.com; Issue of Gourmet April 2006.”  Link to original recipe: http://www.epicurious.com/recipes/food/views/Fresh-Homemade-Ricotta-234282

View original post

 
1 Comment

Posted by on November 8, 2013 in Uncategorized


Pan-Seared Brussel Sprouts with Pancetta and Parmesan

Pan-Seared Brussel Sprouts with Pancetta & Parmesan

Now that it’s November all I can think about is Thanksgiving.  It is my favorite holiday.  Obviously the emphasis on food doesn’t hurt, but it is just a no-stress enjoyable time with the family.

I love brussel sprouts and have decided to add them to our Thanksgiving dinner this year.  We have a couple of gluten-free eaters and this will just be another option for them and me to load up on!

I have made this twice now, both on weeknights and it has been devoured before we can even get to the rest of the food.  It’s quick, easy, healthy, and delicious!

Yield: 4 Servings

Ingredients:

  • 1 tsp. coarse kosher salt
  • 1 pound brussel sprouts
  • 1 oz pancetta*
  • 1 tsp. bacon fat, olive oil, or duck fat**
  • 1/2 oz Parmiggiano-Reggiano, finely shredded
  • 1/4 tsp. fresh ground black pepper
  • 1 Tbsp. balsamic vinegar

Directions:

  1. Remove stray, ratty looking, or loose leaves from brussel sprouts.
  2. Fill a large bowl with some ice cubes.  Set aside.
  3. Fill a heavy pot with 6 cups of water and 1 tsp. coarse kosher salt.  Bring to a rolling boil.  Add brussels sprouts to water and blanch for 3 minutes.  While sprouts are blanching, fill bowl of ice with cold water.  Remove sprouts from heat and plunge into ice water immediately to stop cooking.
  4. Once cooled, transfer brussels sprouts to a cookie sheet lined with paper towels.  Dry brussels sprouts completely.  Cut brussels sprouts in half, lengthwise.
  5. Cut pancetta in strips, and crisp in a heavy skillet over medium-low heat.
  6. Melt 1 tsp. bacon fat** in a cast-iron skillet over high heat.  Add brussel sprouts.  Using tongs to turn brussel sprouts until all are turned on their flat side.  Allow to sear for 2 minutes.
  7. Add balsamic vinegar and pepper to skillet and stir to coat brussel sprouts.  Remove from heat.
  8. Sprinkle brussel sprouts with pancetta strips and parmesan.  Serve immediately.

* Pancetta doesn’t have as much fat to it as bacon so will burn if the heat is too high.  Remember we’re talking pancetta here, prosciutto doesn’t deal with heat too well so get your P’s right people!!!

**I used bacon fat because I always have it in my fridge.  That’s how I roll!  You can certainly use olive oil.  I would steer clear of extra-virgin for this recipe because you are going to pan-sear these babies over high heat and you wouldn’t want to ruin their amazing flavor with oxidized oil.  If you want to be super luxurious use duck fat.  I wasn’t going to do this for a Tuesday dinner at home, but I will seriously consider it for Thanksgiving.  It really would bring this dish to a whole new level.

 
2 Comments

Posted by on November 2, 2013 in Fall, Sides, Uncategorized


Tags: , , , , ,